Deployment Automation with Google Cloud Build and Nitric
This guide will demonstrate how Nitric can be used, along with Google Cloud Build, to create a continuous deployment pipeline. The actions in the example below target Google Cloud, but can be modified to target AWS or Microsoft Azure.
This guide assumes basic knowledge about Google Cloud Build. If you're unfamiliar, it's recommended to go through Google's Cloud Build docs first.
Configuration setup
To begin you'll need a Nitric project ready to be deployed. If you haven't created a project yet, take a look at the quickstart guide.
Next, we'll add a Google Cloud Build configuration file to the project. This is where you'll configure the deployment automation steps. Create a yaml file cloudbuild.yaml at the root of your project.
The Cloud Build configuration file below is a sample, to show you how to install the Pulumi CLI, Nitric CLI and run a nitric deployment as part of your CI/CD workflow.
Note: The _PULUMI_ACCESS_TOKEN substitution is a simple way to specify the token, but you should consider using encrypted variables.
steps:
  - name: 'gcr.io/cloud-builders/docker'
    script: |
      # Install Pulumi
      curl -fsSL https://get.pulumi.com | sh
      export PATH=$PATH:$HOME/.pulumi/bin

      # Install Nitric
      curl https://nitric.io/install | bash
      export PATH=$PATH:$HOME/.nitric/bin

      # Execute the nitric command
      nitric up --ci
    env:
      - 'HOST_DOCKER_INTERNAL_IFACE=eth0'
      - 'PULUMI_CONFIG_PASSPHRASE=${_PULUMI_CONFIG_PASSPHRASE}'
      - 'PULUMI_ACCESS_TOKEN=${_PULUMI_ACCESS_TOKEN}'
options:
  logging: CLOUD_LOGGING_ONLY
Breaking it down
Edit the config file and start by defining a new job which uses the docker image maintained by the Cloud Build team as the base.
steps:
  - name: 'gcr.io/cloud-builders/docker'
Setup build triggers
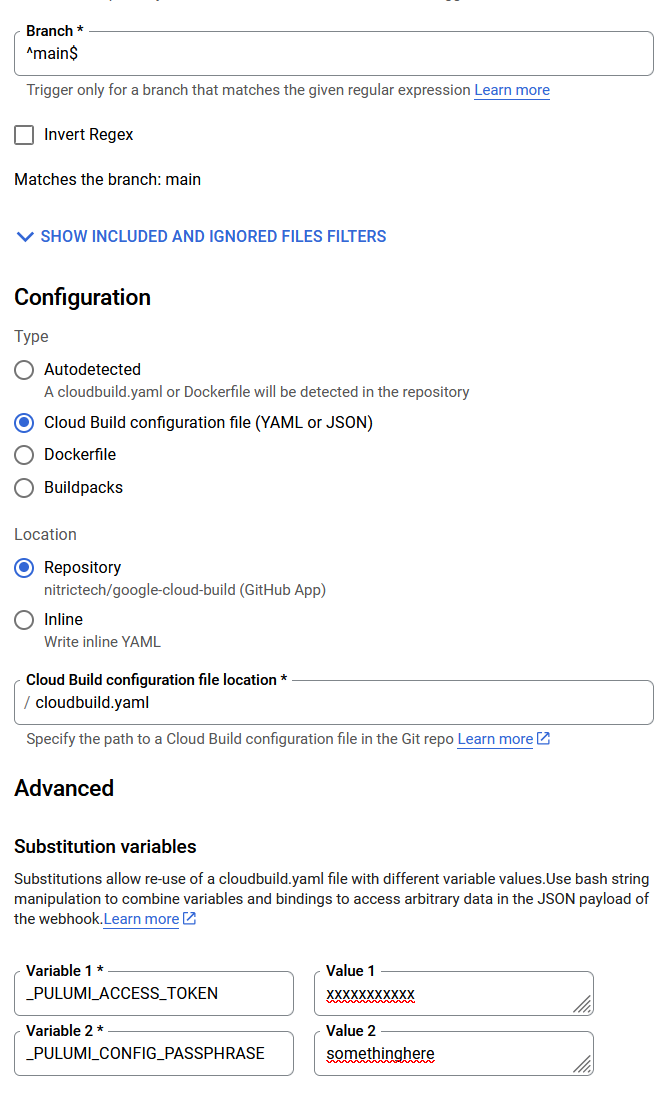
A Cloud Build trigger will start a build automatically whenever changes are made to your source code. You have the flexibility to configure the trigger for all changes in the source repository or for specific criteria. Learn more about creating triggers.
The below config will trigger the build each time there's a commit to the main branch.

In the above configuration, both _PULUMI_CONFIG_PASSPHRASE and _PULUMI_ACCESS_TOKEN are substitutions configured in Cloud Build Triggers. Learn more about creating and managing build triggers in the official documentation.
Environment variables
-
PULUMI_ACCESS_TOKEN
- You can get a pulumi access token by logging into Pulumi on the browser and going to your profile settings. Under the 'Access Tokens' tab click 'Create token'.
-
PULUMI_CONFIG_PASSPHRASE
- For interaction free experiences, Pulumi also requires a passphrase to be configured. Your passphrase is used to generate a unique key which encrypts configuration and state values.
-
HOST_DOCKER_INTERNAL_IFACE
- The network interface that the Nitric CLI will temporarily run the containers on. Without this, the containers can't communicate with the Nitric server whilst gathering the resource definitions.
Install Nitric and dependencies
Install Pulumi and Nitric, which are necessary for running nitric commands and set the relevant environment paths.
Finally, in the script section of the job, you can utilize the up command to deploy your project. The initial argument --ci informs the CLI that it's operating within a CI pipeline, enabling raw output.
steps:
  - name: 'gcr.io/cloud-builders/docker'
    script: |
      # Install Pulumi
      curl -fsSL https://get.pulumi.com | sh
      export PATH=$PATH:$HOME/.pulumi/bin

      # Install Nitric
      curl https://nitric.io/install | bash
      export PATH=$PATH:$HOME/.nitric/bin

      # Execute the nitric command
      nitric up --ci
    env:
      - 'HOST_DOCKER_INTERNAL_IFACE=eth0'
      - 'PULUMI_CONFIG_PASSPHRASE=${_PULUMI_CONFIG_PASSPHRASE}'
      - 'PULUMI_ACCESS_TOKEN=${_PULUMI_ACCESS_TOKEN}'
options:
  logging: CLOUD_LOGGING_ONLY